Testing the Pogo Blood Glucose Meter: Less Precise, More Painful, and Slower than the FreeStyle Lite

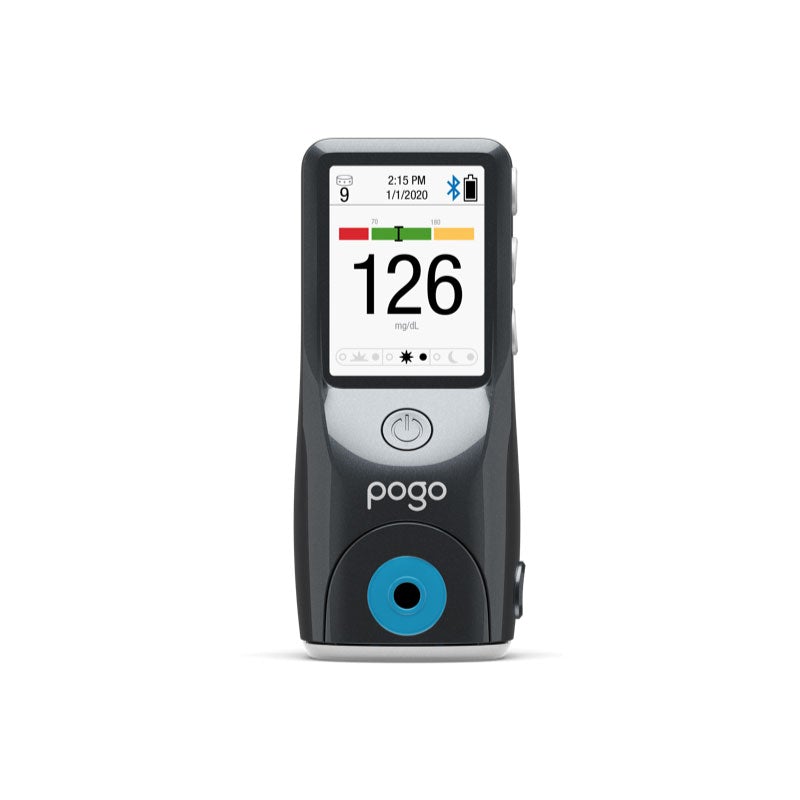
A few weeks ago I saw an article about an interesting new blood glucose meter, the Pogo Automatic Blood Glucose Meter. According to Pogo’s website, the device:

  • Contains the meter, lancets, and strips in a single, compact device
  • Automates changing of lancets and test strips
  • Automates pricking your finger, drawing of blood, and transferring the blood to the test strip
  • Uses less blood than traditional meters (0.25 μL)
  • Meets FDA accuracy requirements (±15% vs. reference meter)

Carrying around a bag with my meter, lancing device, extra lancets, and strips is mildly annoying, so the Pogo sounded like it could be a nice upgrade. To see whether the Pogo was a good as claimed, I bought one and tested it vs. my current meter (FreeStyle Lite) and CGM (Dexcom G6).


Summary

  • I tested 14 sets of 3 measurements each with the Pogo and FreeStyle Lite (98 total)
  • Good
    • The Pogo is very easy to use and could be a big improvement for someone with poor manual dexterity
  • Bad
    • Less reliable: 7 out of 49 failed measurements (14%) vs. 0 for the FreeStyle Lite
    • Less precise: standard deviation of 7 vs. 2.5 mg/dL for the FreeStyle Lite
    • Hurts more: both during lancing & caused sore fingers afterwards
    • Prolonged bleeding: often bled for >1 min. after lancing
    • Slow: >10s to take a measurement vs. <5s for the FreeStyle Lite

Overall, while having everything in a single device is convenient, it’s not even close to worth the poor reliability, reduced precision, and increased pain & bleeding.

Conclusion: I’ll be sticking with my FreeStyle Lite.

This is the first “product review” I’ve done and I’m curious if it’s interesting/useful for people. If you have diabetes or other quantified self products you’d like me to test, please let me know in the comments.


Details

Experiment

  • Over the course of 9 days, I did 14 sets blood glucose measurements and random times.
  • Each time, I took 3 measurements each with the Pogo and FreeStyle Lite, and recorded the result from my Dexcom G6.
  • I also recorded any failed test strips or other observations.
  • For each meter, I calculated the difference pooled standard deviation, bias (vs. Lite), and mean absolute difference (vs. Lite).

Raw data & analysis: link


General Observations

Good

  • It took me a couple tries to get the hang of the technique, but the Pogo is very easy to use. You just turn it on, press your finger on the lancing area, and the Pogo handles the rest.
  • The 10 strip/lancet cartridge is easily inserted into the device, no finesse required.
  • If you have poor manual dexterity, the fact that everything is automated might be a big advantage.

Bad

  • The Pogo is much slower than a normal meter. It takes a few seconds to turn on and waits a few seconds each before lancing and collecting blood. Overall, it takes >10 seconds to get a reading on the Pogo vs. <5 seconds on my FreeStyle Lite. Not terrible, but very noticeable.
  • Lancing hurts a lot more than my normal meter. This seems to be due to a combination of the fact that I can’t control the lance depth and that I’m not in control of when the lancing occurs, which is psychologically more difficult for me.
  • My fingers were often sore where I used the Pogo. I never had any soreness where I used the Freestyle Lite
  • The Pogo was less reliable in drawing blood. In 6 out of 42 tests (14%), the Pogo asked me to “milk” my finger for more blood.
  • Wounds from the Pogo often bled for much longer than my normal lancing device (sometimes >1 min). I had to be careful not to touch anything for a few minutes after testing to avoid getting blood on things.

Precision

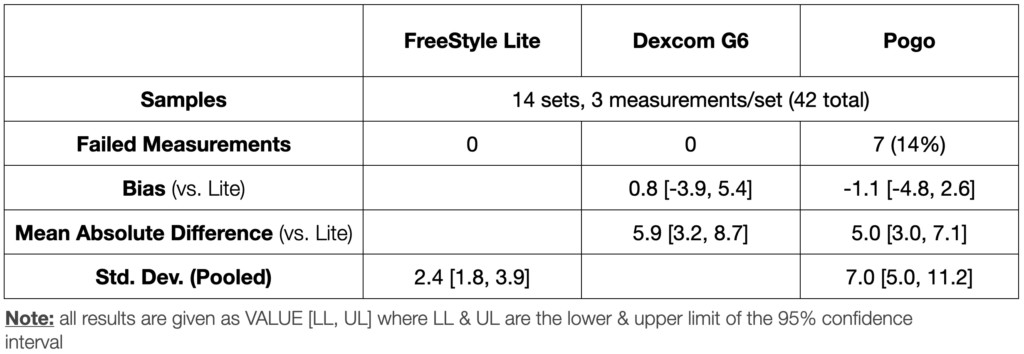
Summary statistics are showing in the table above. The Pogo was:

  • Well calibrated: small and not statistically significant bias vs. the FreeStyle Lite
  • Less reliable: 14% failed tests vs. 0 for the Freestyle Lite
  • Less precise: standard deviation of 7.0 [5.0, 11.2] vs. 2.4 [1.8, 3.9] for the FreeStyle Lite

Importantly, the Pogo showed about the same mean absolute difference as the Dexcom G6, indicating that it wouldn’t add much value as a secondary check of my CGM, which is the main reason I carry a fingerstick meter.


Conclusions

See summary above.


– QD


Get new posts by email or rss feed

Recipe & Product Review: Fruit Vinegar-Flavored Water, the Closest Drink I’ve Found to Fruit Juice

Get new posts by email or rss feed


Left to right: Apple cider vinegar, date vinegar, and raspberry vinegar.

Before I got diabetes, I used to love fruit juice. It’s one of the things I miss most and there really are no good zero-carb substitutes. I’ve found a few kombuchas that I like, but all have at least a few carbs per cup. Not too bad, but not really worth taking medication for. 

Recently, though, I found that I could add apple cider vinegar to water to get a really great sour apple juice flavor. I tried searching for other fruit vinegars, but everything I found had significant amounts of sugar, until u/ChezLuc, on Reddit, pointed me to Supreme Vinegar. They have a huge range of different kinds of vinegars, including 12 fruit vinegars. I e-mailed the company and all have “almost no residual sugar,” except for pineapple (1 g/15 mL). I tested my blood sugar after drinking ~50 mL of the raspberry and didn’t see any rise, so I’m pretty sure they’re telling the truth.

Here’s my thoughts on the raspberry and date flavors (rest were out of stock) and a couple recipe ideas:

  • Raspberry: I really like this flavor. Basically tastes like berries with the sugar removed, though more like blackberry than raspberry. The flavor is very strong (about twice as strong as apple cider vinegar for the same ratio). Surprisingly, it wasn’t very acidic compared with the apple cider vinegar I get from Costco, even though both claim to be diluted to 5% acidity. Maybe there’s something else in the apple that makes it more sour? 
  • Date: This tasted exactly like dates with the sugar removed and was also not very acidic. Personally, I don’t love dates, so this wasn’t my favorite. If you do like dates, though, this would probably be pretty good. 
  • Recipes:
    • Basic: 
      • 20:1 volume ratio of water to vinegar
      • Mix and serve
    • Sweetened: 
      • 20:1 volume ratio of water to vinegar
      • Sweetener to taste. I use 2 drops liquid sucralose or 10g allulose

Overall, I’m really enjoying these and have been drinking a ton of the raspberry vinegar-water over the last week. I’m definitely going to order the rest of Supreme’s flavors once they’re back in stock. I’m especially looking forward to the peach.


– QD


Get new posts by email or rss feed

Maple Syrup Taste Test: 4 Home-Made vs. 4 Store-Bought, all Low-Carb

Get new posts by email or rss feed


Following up on my French Toast post, I wanted to try find a good zero-carb maple syrup to go along with it. On Reddit, u/botrock22 recommended All-u-Lose; I also found several other brands on Amazon that looked pretty good. I also did a search for low-carb or keto maple syrup recipes and found a couple that looked promising.

To figure out which I liked best, I decided to do a taste test.

Contenders:

I assessed each syrup on the following factors:

  • Calories
  • Net carbs
  • Ingredients
  • Cost
  • Taste
  • Texture

Here’s the results:

Note: After I bought it, I noticed the Sweet-Like-Syrup brand uses isomaltose as the sweetener. Isomaltose is not low carb (GI = 35), so I didn’t try it.

For me, homemade version #2 (24 wt% water) was the clear winner, probably because it was adjusted to my taste preference. It had a strong maple flavor, was thick enough to cling to the french toast while still spreading easily, and didn’t have any unpleasant aftertaste. It was also extremely easy to make and cheaper to boot. I’m going to start keeping a batch around for French toast, pancakes, and other deserts.

I’ve included the recipe below if you want to make it yourself.


Hope you enjoy it!

– QD


Low-Carb Maple Syrup

QD
A simple low-carb maple syrup
Prep Time 1 minute
Cook Time 35 minutes
Total Time 36 minutes
Servings 500 mL
Calories 1 kcal

Ingredients
  

  • 250 g allulose
  • 5 g molasses
  • 80 g water
  • 2 tsp maple extract
  • ½ tsp vanilla extract

Instructions
 

  • Combine allulose, molasses, and water in a pot. Bring to a boil and reduce heat to a simmer.
  • Cover and simmer for 15 min., then let cool for 20 min. and stir in the maple and vanilla extracts.
  • Transfer to a sealable container and serve or store.

Notes

0.2g net carb/tbsp.
Nutrition information calculated by adding up macros of the individual ingredients. Allulose not included in total or net carbs.

Nutrition

Serving: 1tbspCalories: 1kcalCarbohydrates: 0.2g
Tried this recipe?Let us know how it was in the comments

Get new posts by email or rss feed


– QD

Low Carb Maple Syrup

Yield: ~500 mL

Author: QD

prep time: 1 Mcook time: 35 Mtotal time: 36 M


ingredients:


  • 250 g allulose
  • 5 g molasses
  • 80 g water
  • 2 tsp. maple extract
  • 1/2 tsp. vanilla extract


instructions:

How to cook Low Carb Maple Syrup


  1. Combine allulose, molasses, and water in a pot. Bring to a boil and reduce heat to a simmer.
  2. Cover and simmer for 15 min., then let cool for 20 min. and stir in the maple and vanilla extracts.
  3. Transfer to a sealable container and serve or store.

Calories

1

Net Carbs(grams)

0.2

Calculated per tablespoon.

Created using The Recipes Generator