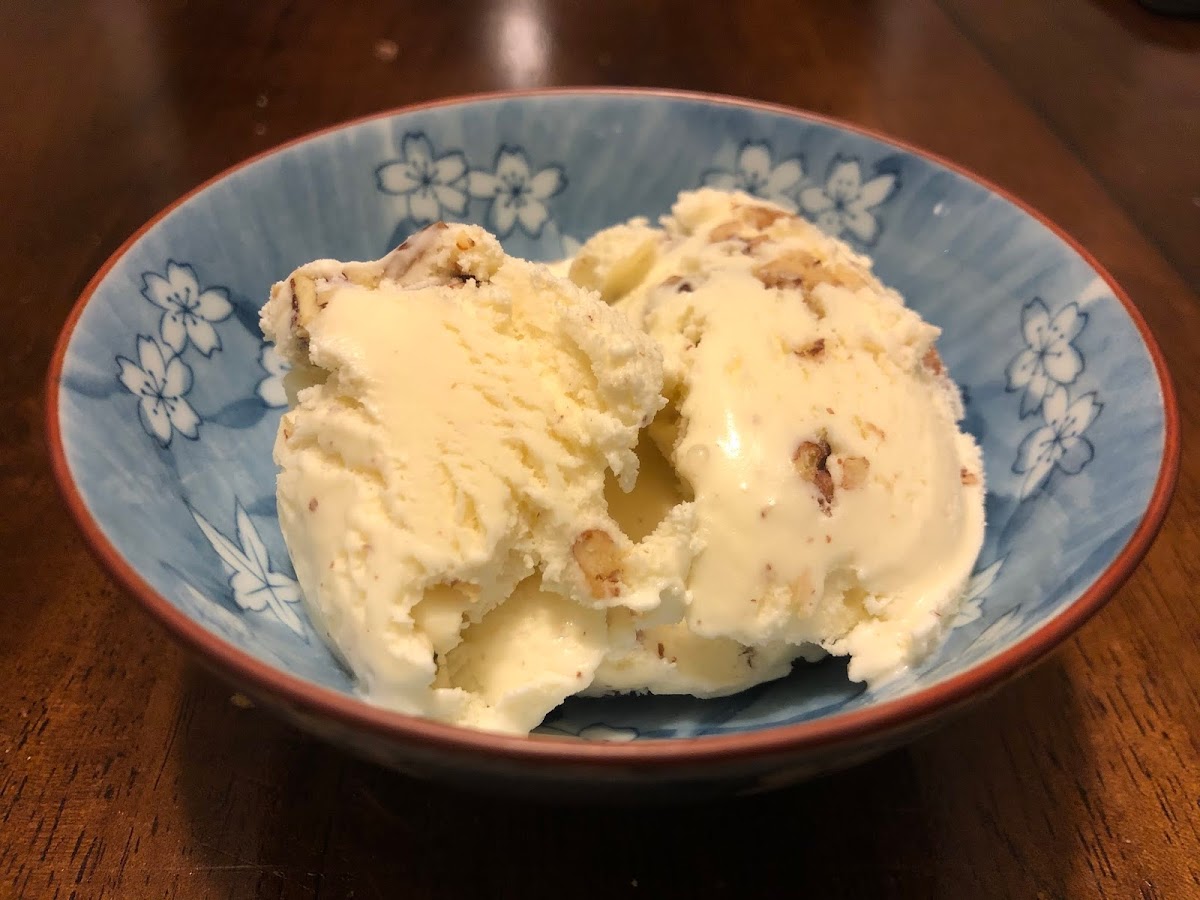
Continuing my series of low-carb ice cream recipes, here’s one for butter pecan.
This one’s adapted from a Reddit post from u/olympia_t, with the following modifications:
Increased scale by 50% to fill my 1 quart ice cream maker
Used unsalted pecans and added salt to increase control
Increased egg yolks from 3 to 5
Added stabilizer for texture (either ice cream stabilizer or vodka and xanthan gum)
The key to getting the strong brown butter and pecan flavors is to make sure to heat the butter, pecan, sweetener mix until is an intense golden brown and to take the cream mixture to 180 °F before tempering the eggs.
As in previous recipes, I give two different options for the stabilizers. If you use the ice cream stabilizer mix, it will stay scoopable even when frozen. If you use the alcohol + xanthan gum, it will freeze solid, but return to an ice cream texture if allowed to warm for 10 min. or so before eating.
Mix allulose with ice cream stabilizer and set aside. If replacing the stabilizer with vodka + xanthan gum, don’t add them here. Instead add with the vanilla.
Melt butter in a saucepan over medium-low heat.
Add pecans and salt; roast until fragrant.
Add sweetener and heat until it’s golden brown.
Add almond milk and cream. Continue cooking until the temperature reaches 180 °F and the mixture has turned a strong golden brown.
Remove pecans and set aside. Then, temper the egg yolks, transfer the mixture back to the saucepan, and continue cooking on medium-low heat until thickened and able to coat the back of a spoon, ~5 min.
Strain into a bowl, refrigerate for at least 4 h (preferably overnight).
Freeze in an ice cream machine, adding pecans when about 5 minutes remain.
Notes
1.7g net carbs per serving.Nutrition information calculated by adding up macros of the individual ingredients. Allulose not included in the Total or Net carbs.
Liquid sucralose instead of stevia because I don’t like the taste of stevia
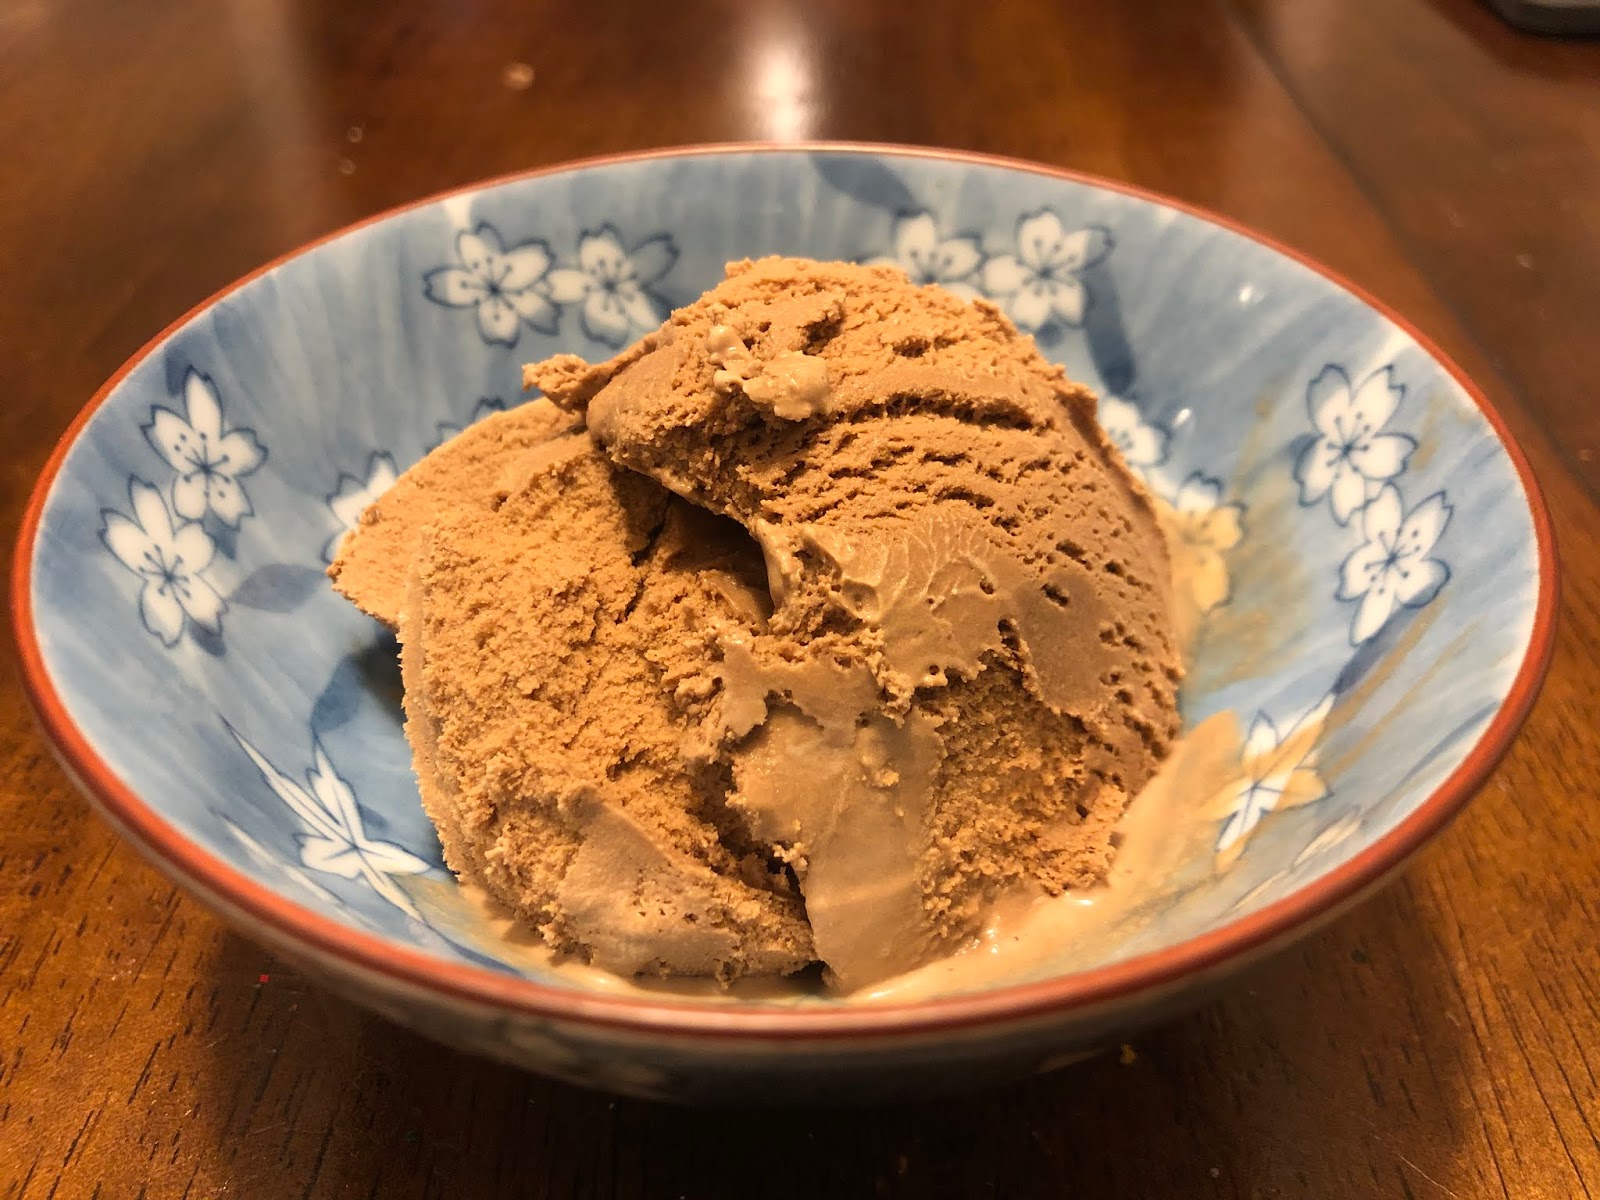
Like the Snickerdoodle, this one’s a bit more work due to the custard base. However, since the chocolate adds a lot of richness by itself, I think next time I’ll try this with a Philly base and see if I like it better.
As in previous recipes, I give two different options for the stabilizers. If you use the ice cream stabilizer mix, it will stay scoopable even when frozen. If you use the alcohol + xanthan gum, it will freeze solid, but return to an ice cream texture if allowed to warm for 10 min. or so before eating.
Hope you enjoy it,
– QD
Extra Rich Keto Chocolate Ice Cream
QD
Rich, low-carb, chocolate ice cream using a custard base
In a saucepan, whisk together allulose, cocoa powder, and stabilizer. If replacing the stabilizer with vodka + xanthan gum, don’t add them here. Instead add with the vanilla.
Add cream and almond milk and heat over medium to medium-low heat until the temperature is 170 °F, stirring frequently to prevent scorching.
Using the hot mixture, temper the egg yolks, then return the tempered mixture back to the saucepan and continue heating until ~175 °F and the mixture is thick enough to coat the back of a spoon.
Remove from heat and add the chopped chocolate. Let sit for 5 minutes to melt, then whisk until smooth.
Strain the thickened mixture through a fine mesh sieve and into a bowl set in an ice bath. This removes lumps and rapidly cools down the mixture to stop further cooking of the eggs.
Refrigerate for at least 4 hours and preferably overnight.
Whisk in the second portion of almond milk, vanilla, and liquid sucralose (Note: the mixture will be very thick until these ingredients are mixed in), then churn in ice cream maker according to the manufacturer’s instructions.
Notes
4.7g net carbs per serving.Nutrition information calculated by adding up macros of the individual ingredients. Allulose not included in the Total or Net carbs.To reduce the calorie content, you can replace part of the heavy cream with additional almond milk (1:1 by weight). I’ve gone as low as 110 g heavy cream and it’s still good, though less rich. Even lower might be possible, but I haven’t tried.
Towards this end, over the last week, whenever I exercised, I measured my blood glucose before and at 15 min. intervals after exercise until my BG had recovered to baseline or I did something that would change my BG (ate, took medicine, etc.).
Key Learnings:
The drop after exercise is large and significant, averaging 25 mg/dL for a 200 kCal bike ride and 10 mg/dL for MMA and strength training.
With one exception, whenever I could measure, my BG recovered to baseline within 45 min. and usually started to come back up within 15 min.
This indicates I’m not in any danger with my current exercise regime, but should reassess if I significantly change the intensity, duration or type of exercise.
There are no clear trends in the magnitude of the drop of recovery time with anything I measured, but there are hints of effects with intensity, time of day, and type of exercise. I need to collect more data.
Next Experiments:
I’m always interested in ideas for new experiments, so please leave a comment if there’s something you’d like me to try.
Exercise studies: Continue to collect data, varying intensity and type of exercise to try to figure out trends.
Long peak from breakfast & lunch: Measure blood glucose at 15 min. intervals a few more times after breakfast & lunch. Try varying protein and fiber content to see if those are the causes. Try normal-acting insulin to mitigate.
Food & medication studies: It’s proving difficult to disentangle the numerous effects going on at any given meal by adding or subtracting particular foods (data too noisy, too many measurements required to observe a statistically significant effect). Instead:
Skip meals and medication to measure background trends.
Consume individual ingredients (glucose, protein, fiber, etc.) or take individual medications to measure their direct effects.
Measure combinations of ingredients and medications to measure interaction effects.
This will require more experiments, but I think in the end it will require less time & effort
Details
Purpose
Determine the short term effect of exercise on my blood sugar and if I am in danger of a severe hypoglycemic event.
Design/Methods
General. Blood glucose was measured using a FreeStyle Freedom Lite glucose meter and FreeStyle lancets & test strips. No special precautions were taken to clean the lancing site before measurement. To take a sample, the lancing devices was used to pierce the skin at an ~45 deg. angle from the finger. Blood was then squeezed out by running the thumb and pointer finger of the opposite hand from the first knuckle to the lancing site of the finger. Blood was then wicked into a test strip that had been inserted into the meter and the glucose reading was recorded.
Measurements were taken before exercise and at 15 minute intervals after exercise until my blood sugar had returned to the baseline value or I did something that would change my BG (ate, took medicine, etc.).
Recovery time was calculated as the time until blood glucose returned to within 5 mg/dL of the value before the start of exercise.
For bicycling, I used a stationary bike and recorded the reported calories burned. This is almost certainly inaccurate, but appears to be a consistent function of the pedaling speed and resistance setting. As such, I used it as a quantitative measure of the intensity of the exercise.
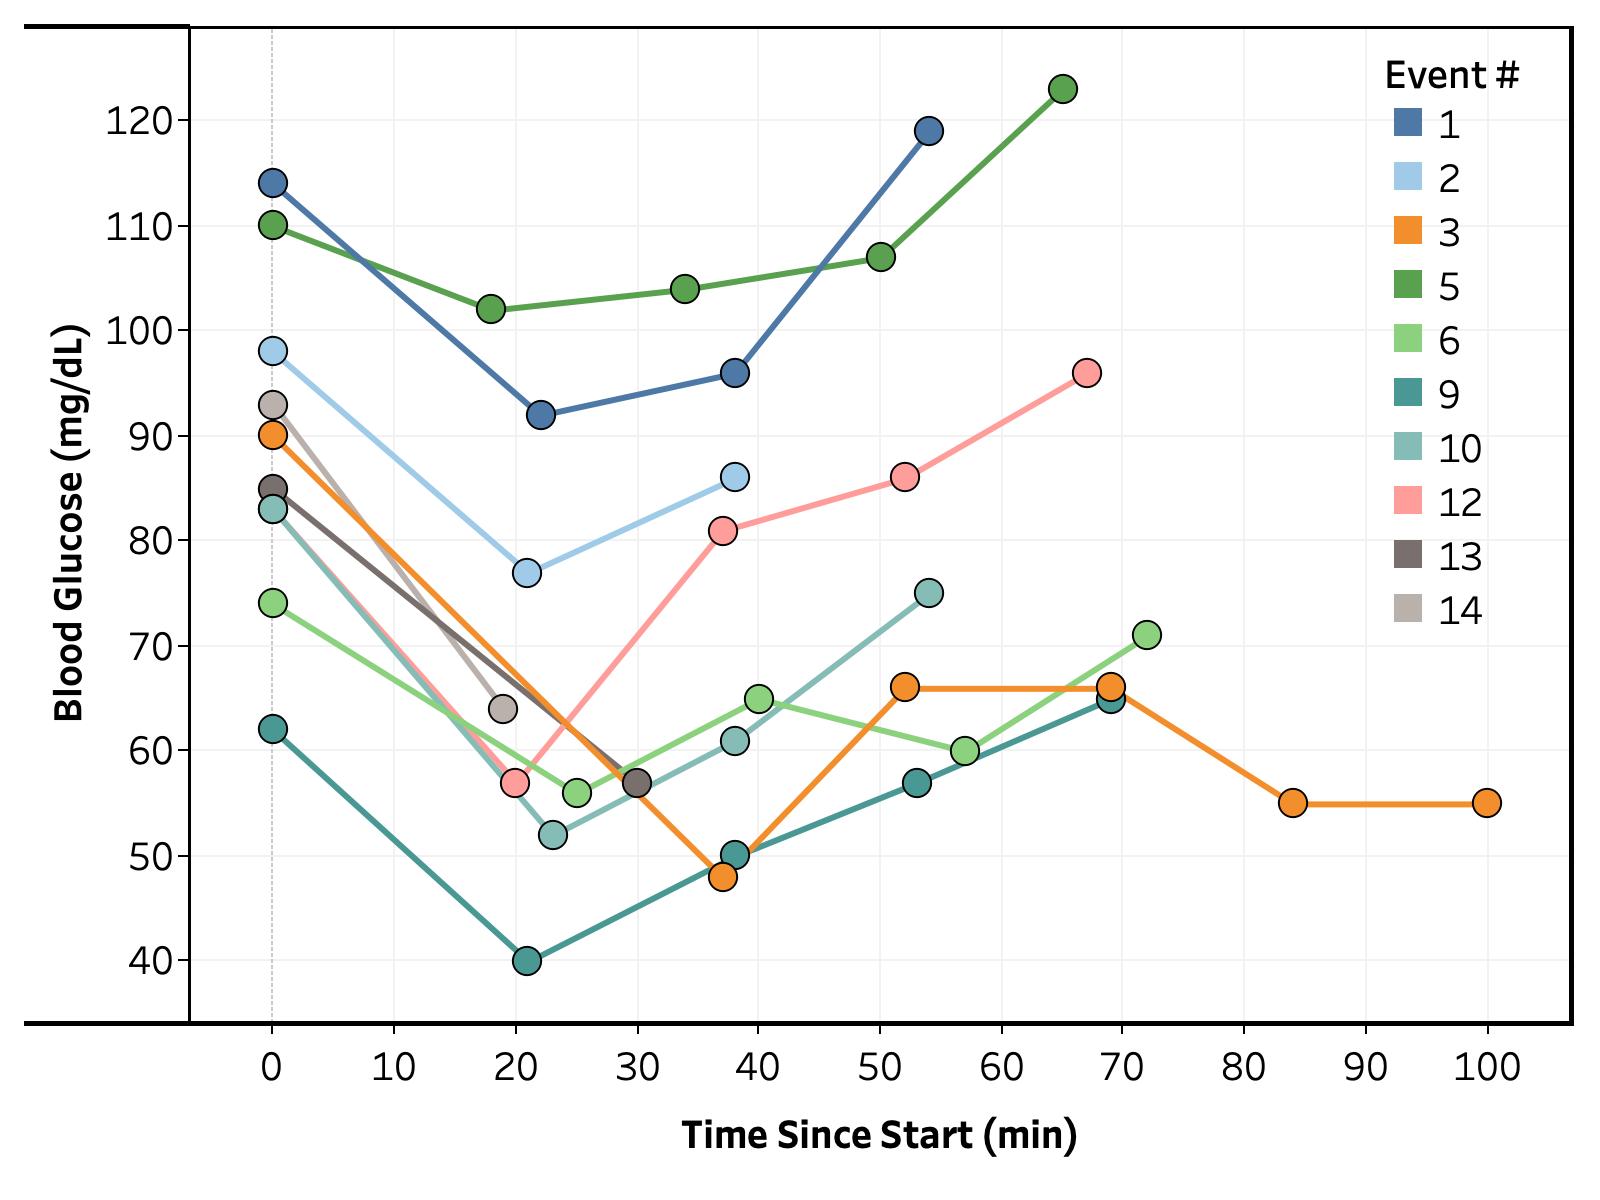
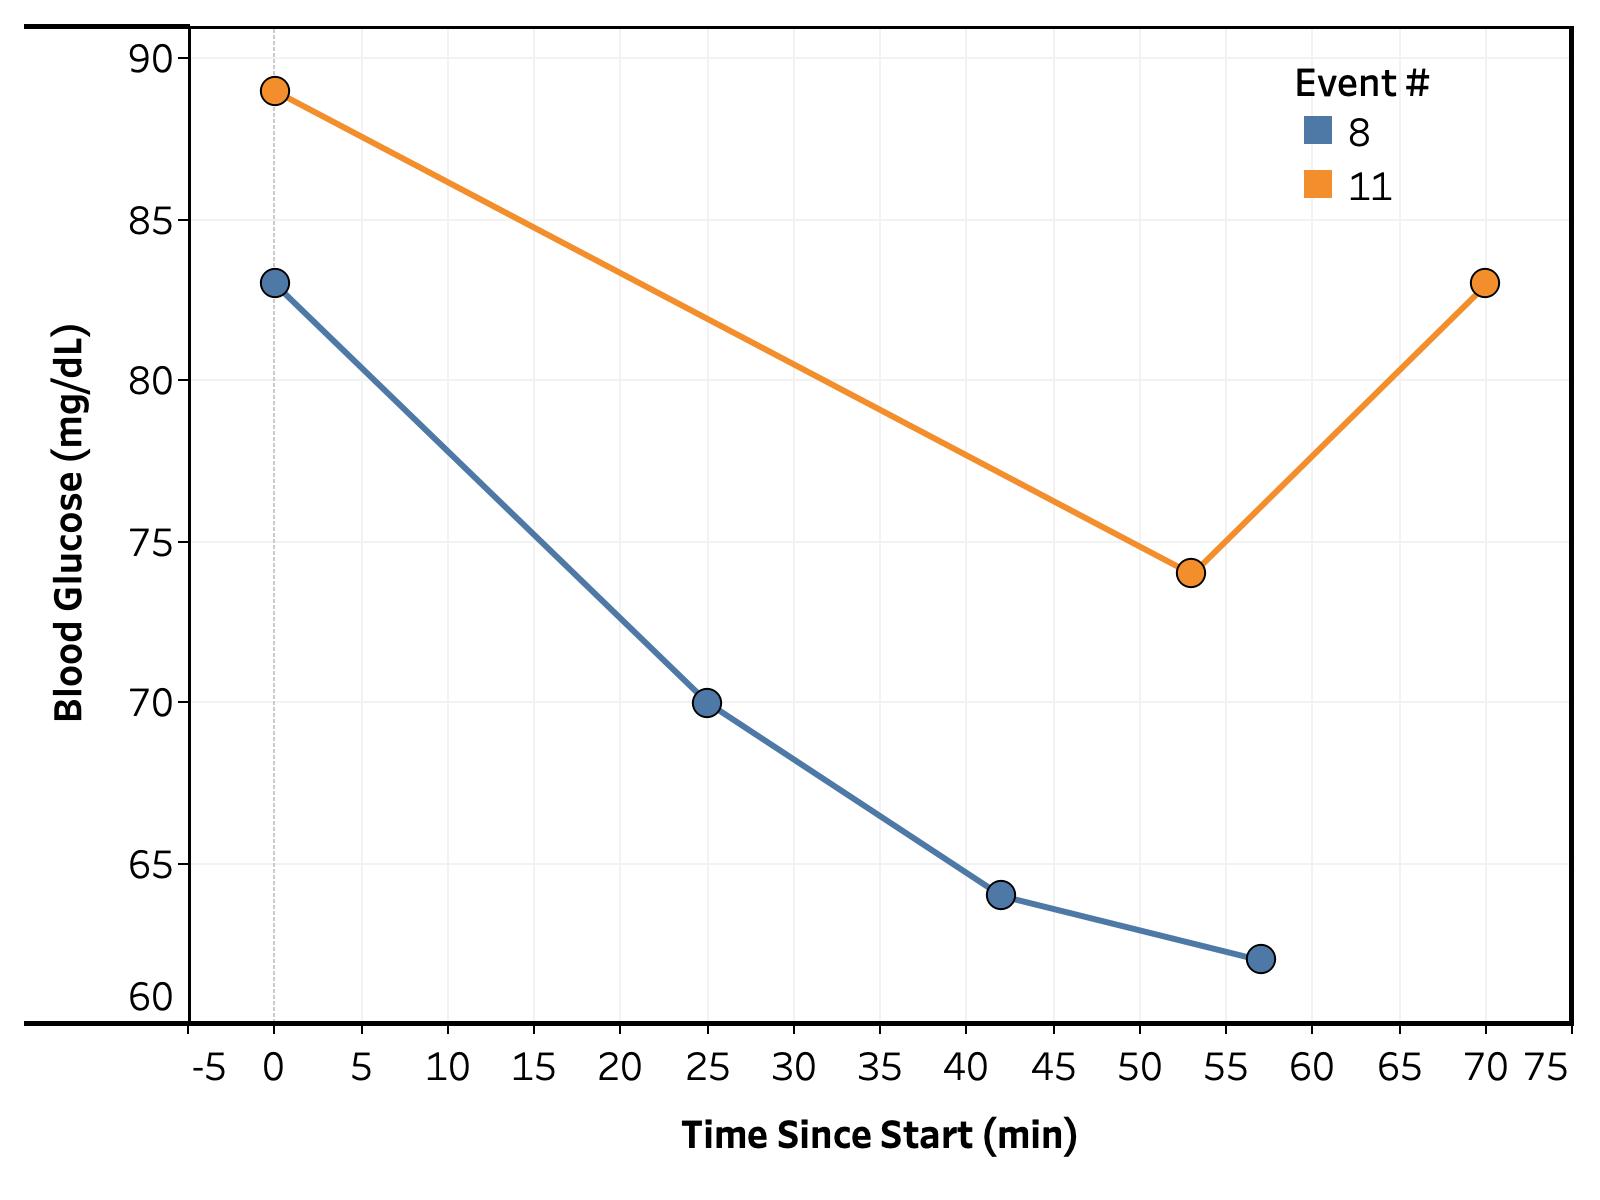
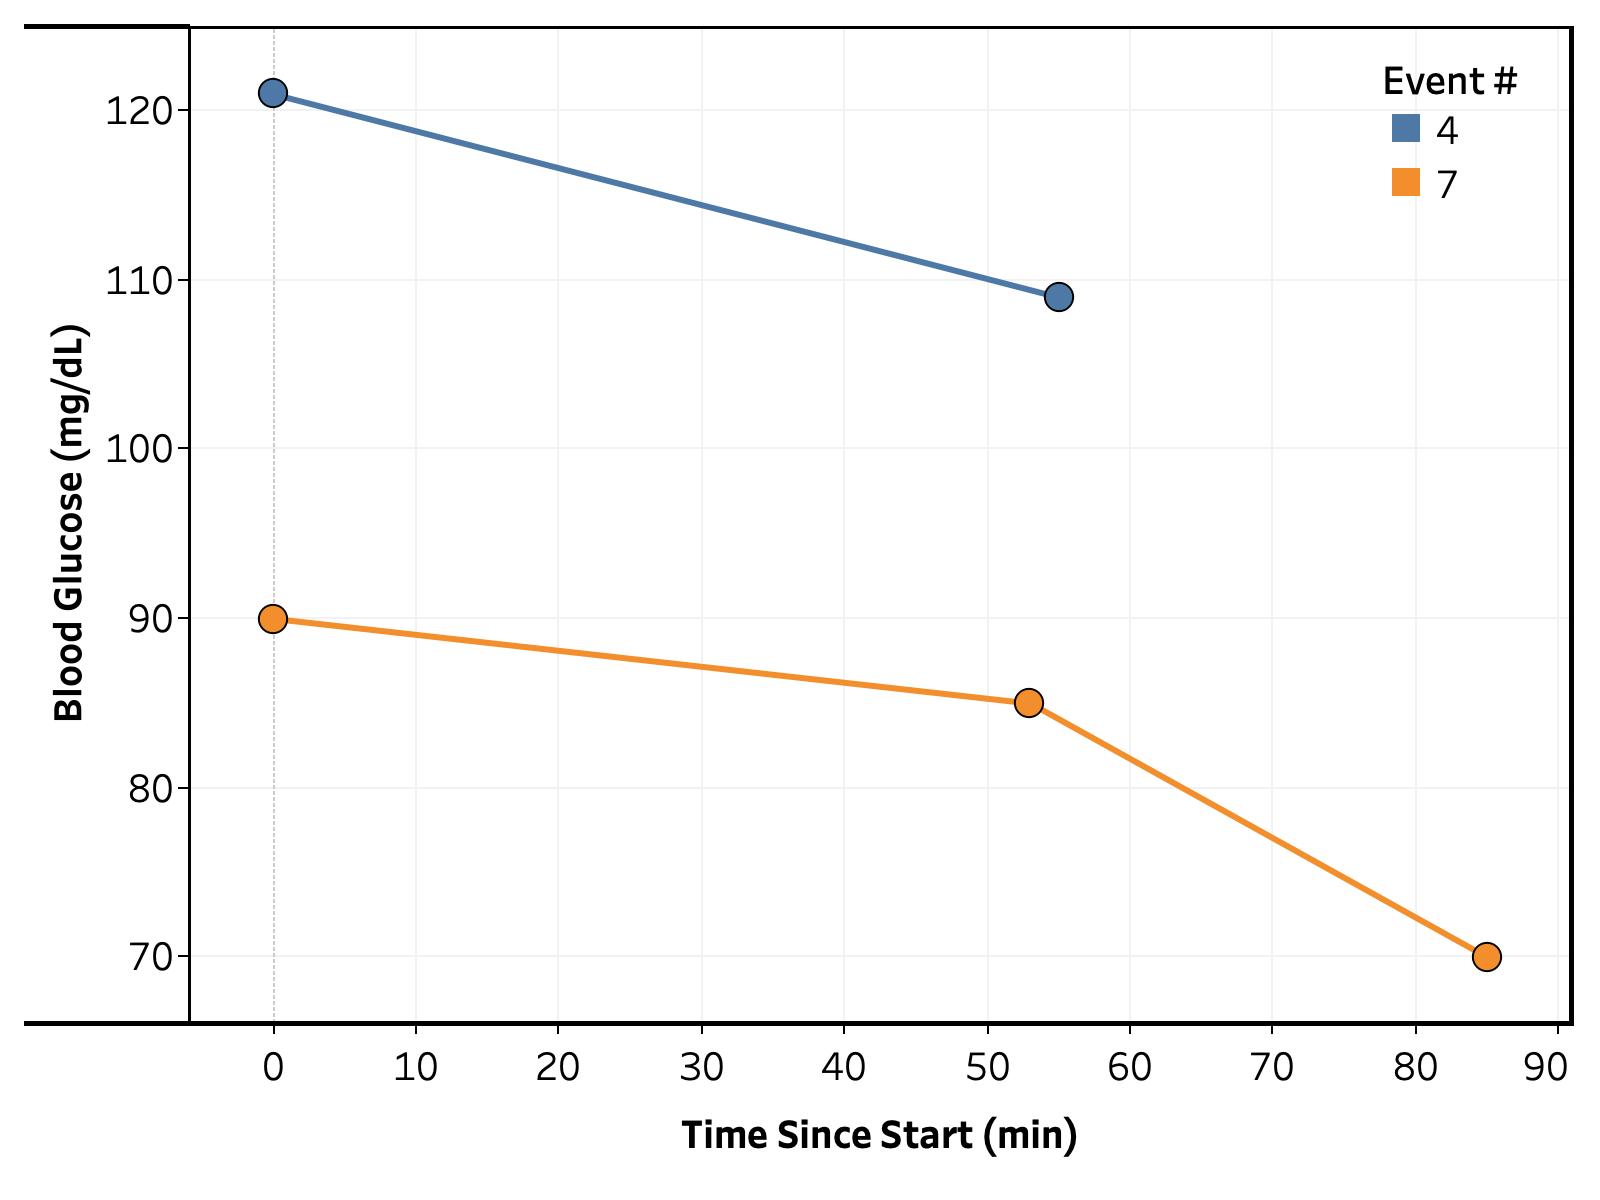
Figure 1. Blood glucose vs. time before and after bikingFigure 2. Blood glucose vs. time before and after strength training
Figure 3. Blood glucose vs. time before and after MMA
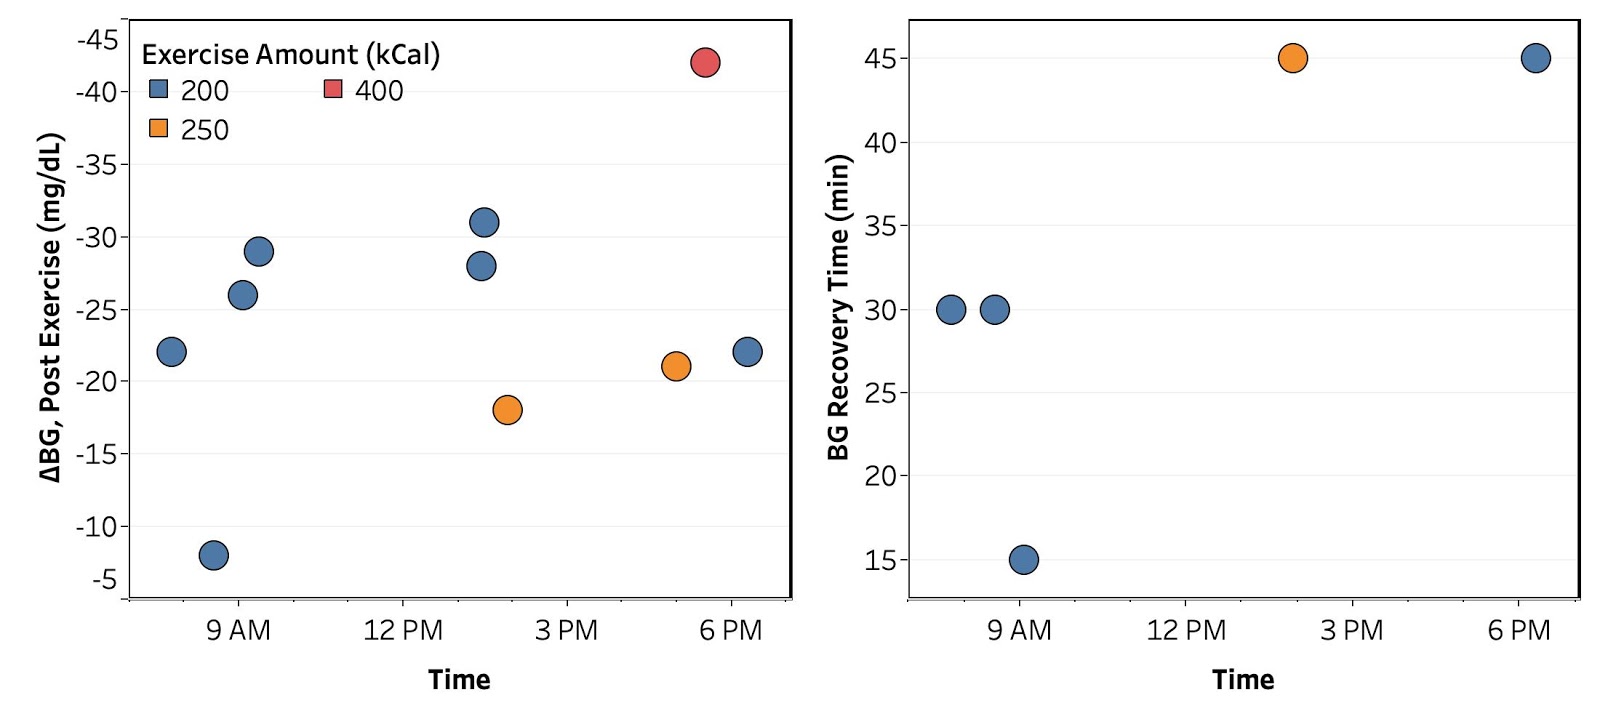
Overall. The full set of BG vs. time traces are shown in Figures 1, 2, and 3. The data roughly corresponds to the previously observed trend, a drop in BG during exercise followed by recovery over 15-60 minutes. To get a better understanding of what’s going on, I calculated the change in blood glucose from the initial measured value and bucketed readings in 15 minute intervals from the end of exercise (i.e. 15, 30, 45, and 60 min. post-exercise).
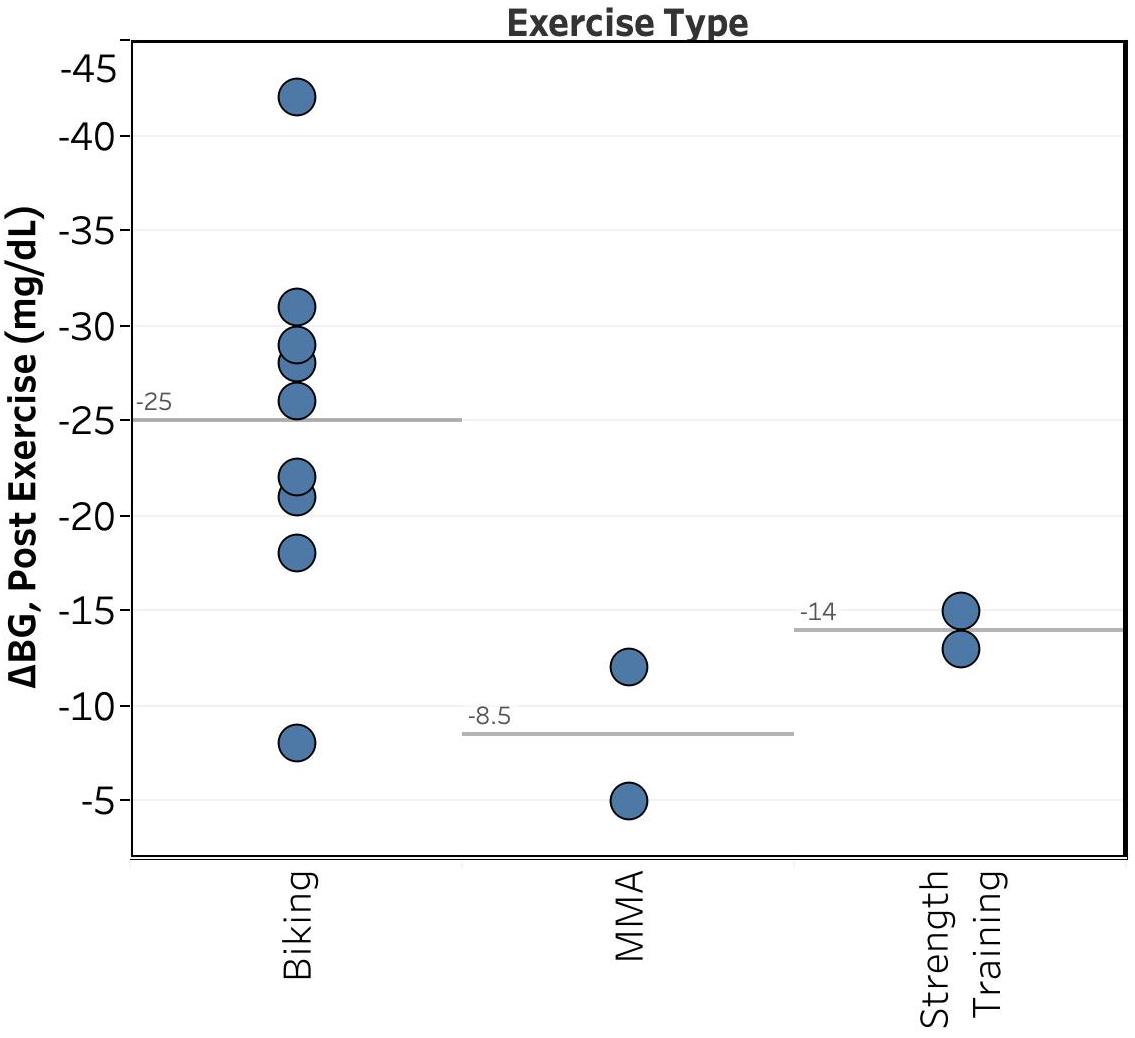
Figure 4. Initial BG drop vs. type of exercise. Reference lines show average value.
Type of Exercise. Unsurprisingly, as shown in Figure 4, the type of exercise had the largest effect on the magnitude of my drop in BG, with biking showing an average drop of 25 mg/dL and MMA & strength training showing average drops of ~10 mg/dL.
Unfortunately, it’s difficult to draw any conclusions from this, as I do different types of workouts at different times of day (e.g. MMA on weekday mornings, biking & strength training on weekend mornings or weekday evenings).
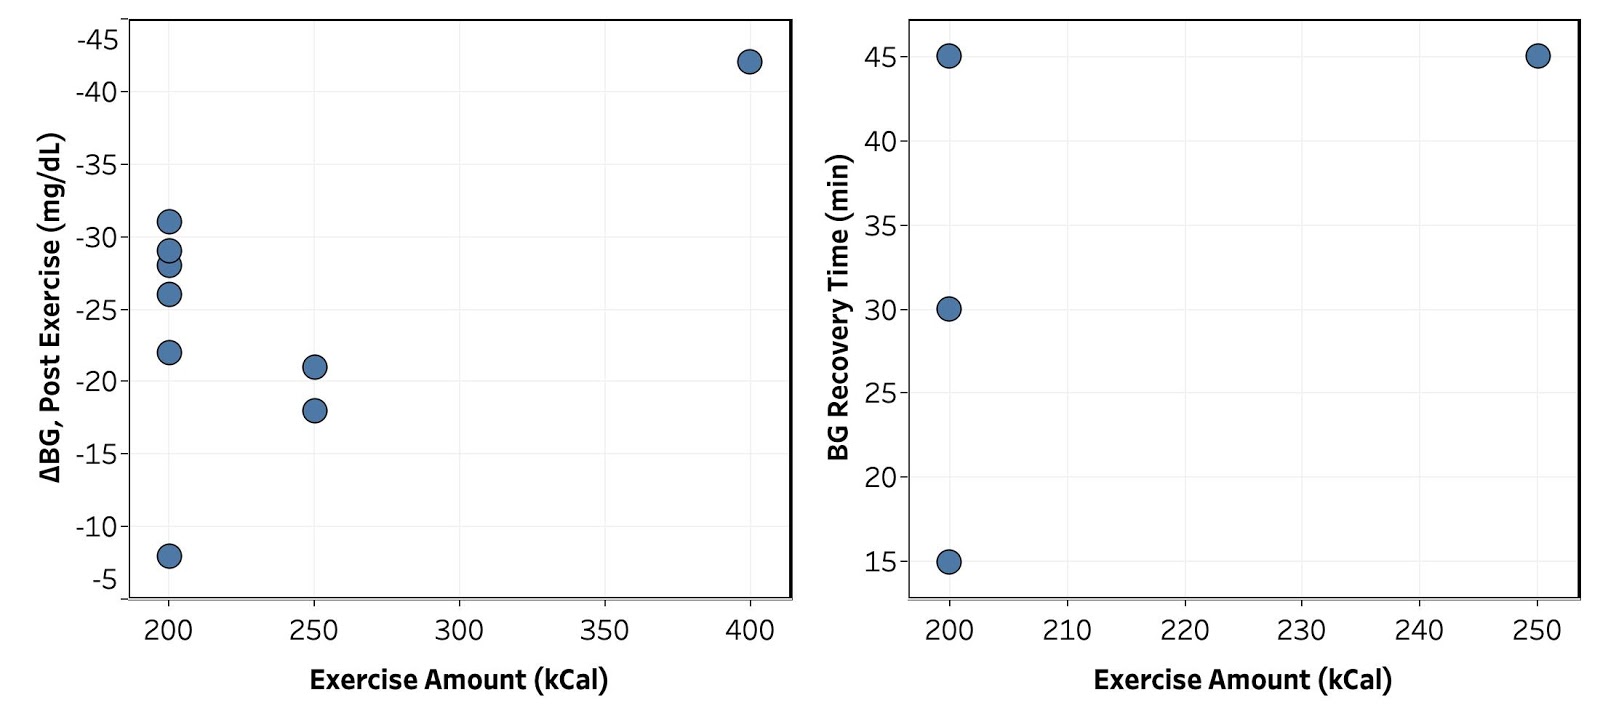
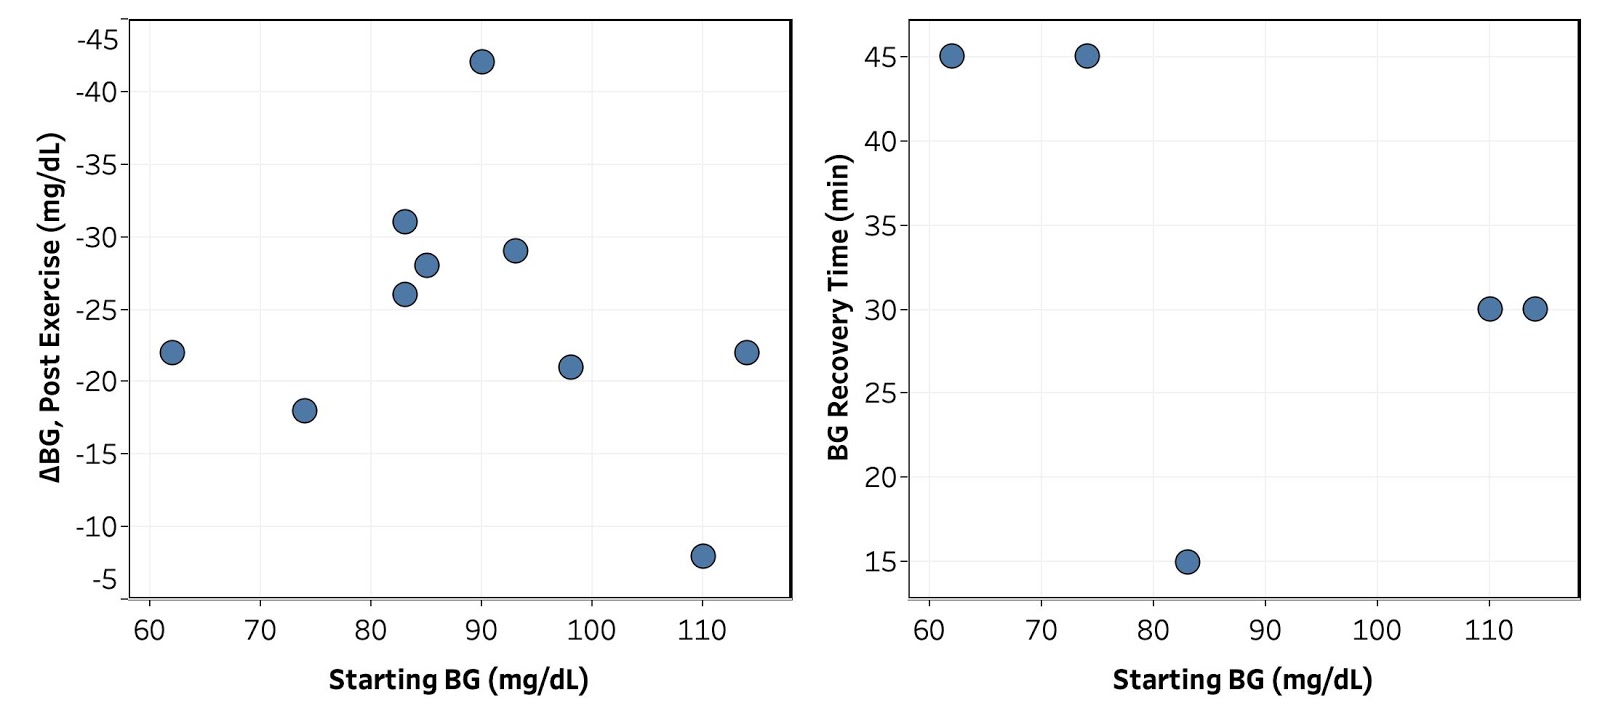
Figure 5. Initial BG drop and recovery time vs. exercise intensity.Figure 6. Initial BG drop and recovery time vs. initial BG.Figure 7. Initial BG drop and recovery time vs. time of day.
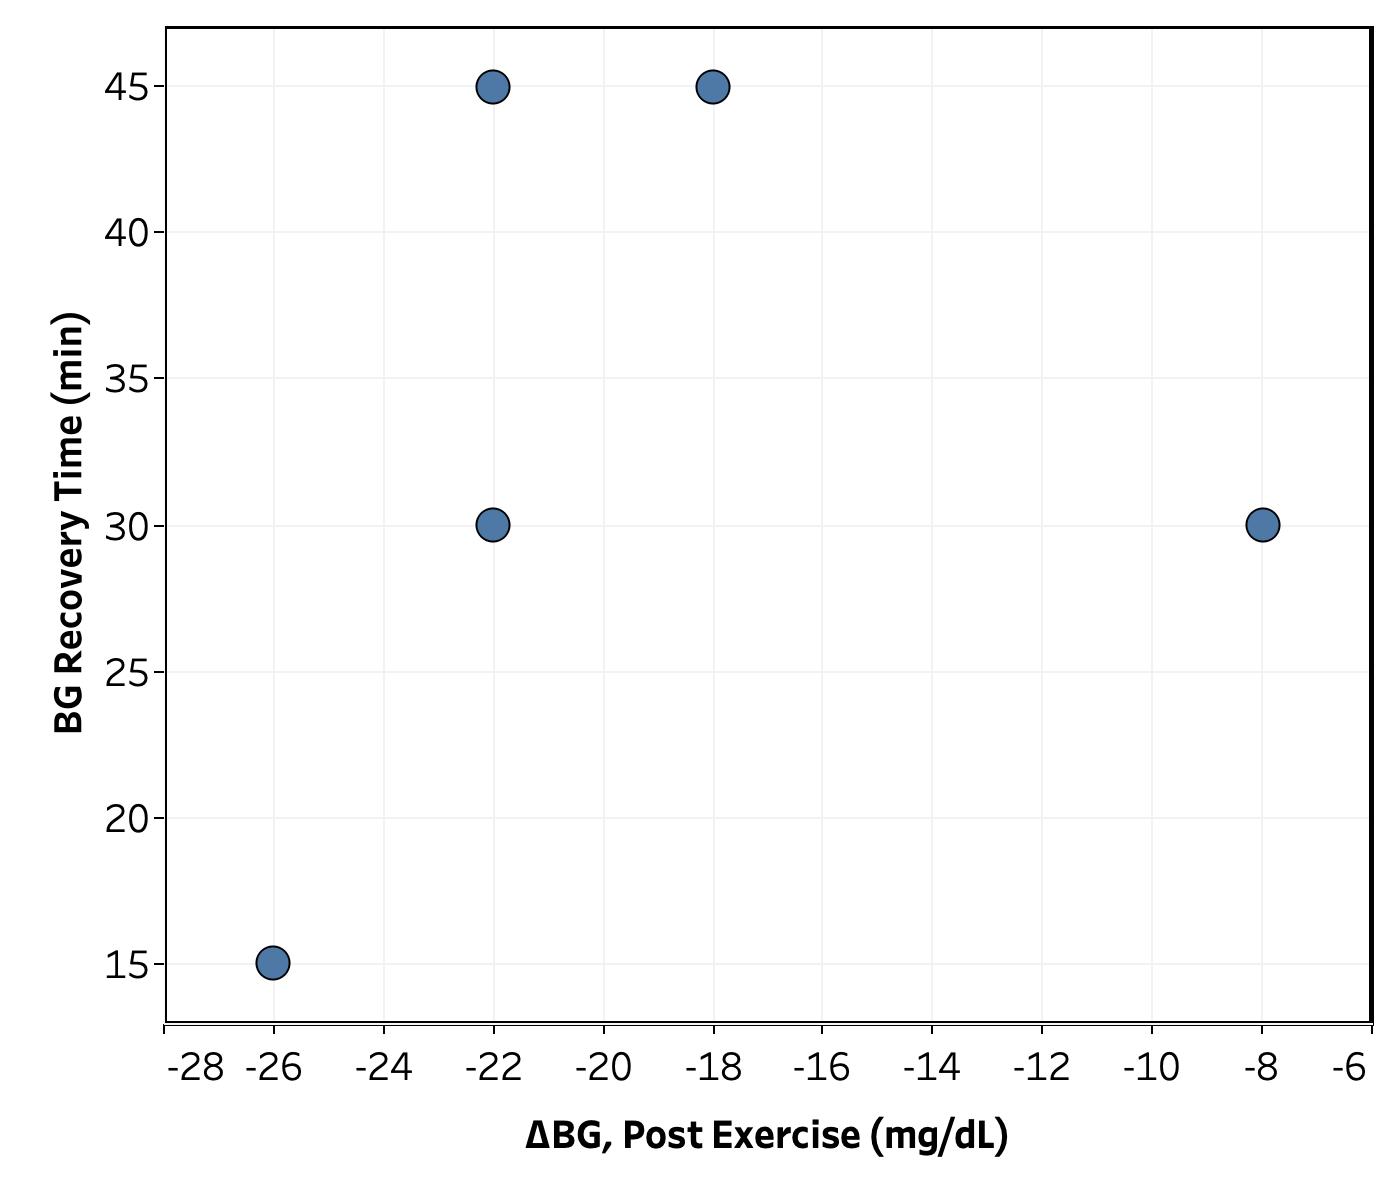
Figure 8. Recovery time vs. initial BG drop.
Exploratory Analysis of Trends. I next attempted to see if there were any trends in the BG effect with intensity of exercise, starting BG, or time of day. As shown in Figures 5, 6, 7, and 8, the amount of data I have so far is not sufficient to determine any clear trends. However, a there are hints of a few possibilities:
Figure 5: Initial BG drop may be positively correlated with exercise intensity. This conclusion relies on a single data point from a 400 kCal bike ride and so is highly suspect.
Need to get more data at different intensities. May also need a better measure of intensity. Maybe look at both kCal and duration of ride?
Figure 6: Initial BG drop and recovery time show a maximum and minimum, respectively, when initial BG is close to “normal” (80-95 mg/dL). Again, not nearly enough data to have any confidence in this conclusion, but worth looking at again when I have more data.
Figure 8: With one outlier, recovery time increases as the BG drop gets smaller. This is a counterintuitive to me and also worth keeping an eye on.
Conclusion
See summary above. All-in-all, this initial data is promising and allays my worry about a dangerous hypoglycemic event during exercise, but I need to get more data in order to get anything interesting out of it. I’ll keep monitoring and post again when I’ve learned more.
A few days ago, u/NeutyBooty posted on how hot showers caused their blood glucose to rise. Lot’s of commenters confirmed the general observation, but for some it appeared to be a CGM artifact, for some it matched their finger-stick meter, and others they see a BG drop.
We currently have 7 Redditors participating from the original thread, but I’m hoping we can get even more people signed up so we can get a really great data set. Anyone’s who’s interested in participating, please comment or PM me.
The basic idea is to agree on a simple experimental protocol, each of us run the experiment, combine and analyze the data, and see if we can figure out 1) Is the shower effect real or a CGM artifact and 2) how does it vary from person-to-person?
The 7 of us organized and worked out the protocol using group chat and and a new subreddit, r/QuantifiedDiabetes. We’re starting the experiments and looking for more participants.
Here’s the details:
Background:
In u/NeutyBooty‘s post on hot showers causing blood glucose to rise, lot’s of commenters confirmed the general observation, but for some it appeared to be a CGM artifact, for some it matches BGM, and for others they see a BG drop.
From my PMs, some of us have CGM’s, some have regular BGM’s, and some have both.
Questions to answer:
Is the “hot shower effect” a real change in blood glucose or an artifact of CGM sensors getting warm (or some other environmental change)?
What is the person-to-person variation in the magnitude and direction of the “hot shower effect?”
Protocol:
Pick a time when your blood glucose is relatively stable (no recent meals, medication, exercise, etc.)
Turn on the shower to the hottest temperature you’re comfortable with and let the temperature stabilize. If possible, measure the temperature (e.g. with an instant read thermometer).
Measure your blood glucose with both a CGM and regular finger-stick meter and record the data.
If you don’t have both types of meters, use whichever you do have (data will still be useful for the second goal)
Take a 20 minute shower.
As soon as you finish the shower, measure your blood glucose again with both a CGM and regular finger-stick meter and record the data.
Monitor your blood sugar for one hour (measure every 15 min. for finger-stick meter)
Record anything that might have affected blood glucose during the experiment.
Repeat the experiment multiple times (preferably ≥3, but any data is better than nothing) to assess within-person variability.
Post your data in a comment or PM to u/sskaye. I’ll compile it and make available to everyone to analyze
If you want your data to be anonymous, just let me know and I’ll remove all identifying info.
Optional variations:
Vary the time or temperature of the shower
Try a bath, hot tub, or sauna instead of a shower.
Data to collect:
For each glucose measurement: time, blood glucose, any important observations
To avoid significantly increasing my total calories, I first tried just adding protein powder to my breakfast and lunch shakes. That got me the protein I wanted, but it diluted the flavor of the shakes, which I didn’t like.
Next, I tried searching around for a solid low-calorie, high-protein food. Not finding anything, I decided to make my own (still looking, so please comment if you have any suggestions). I started off with a recipe for oat-fiber bread from The Fruit of Her Hands. The oat-fiber, egg white, and glucomannan combination gave me the bulk and texture I wanted with almost no calories.
INITIAL ADAPTATION
To add protein, I substituted whey protein isolate for 36% of the oat-fiber and dropped the cooking time to 18 min. I also swapped cinnamon and liquid sucralose for the onion and garlic powder to make a slightly sweet instead of savory version.
The resulting muffins tasted decent, but the texture was always either a bit too dry or (if I lowered the cooking time) the top center of the muffin was undercooked.
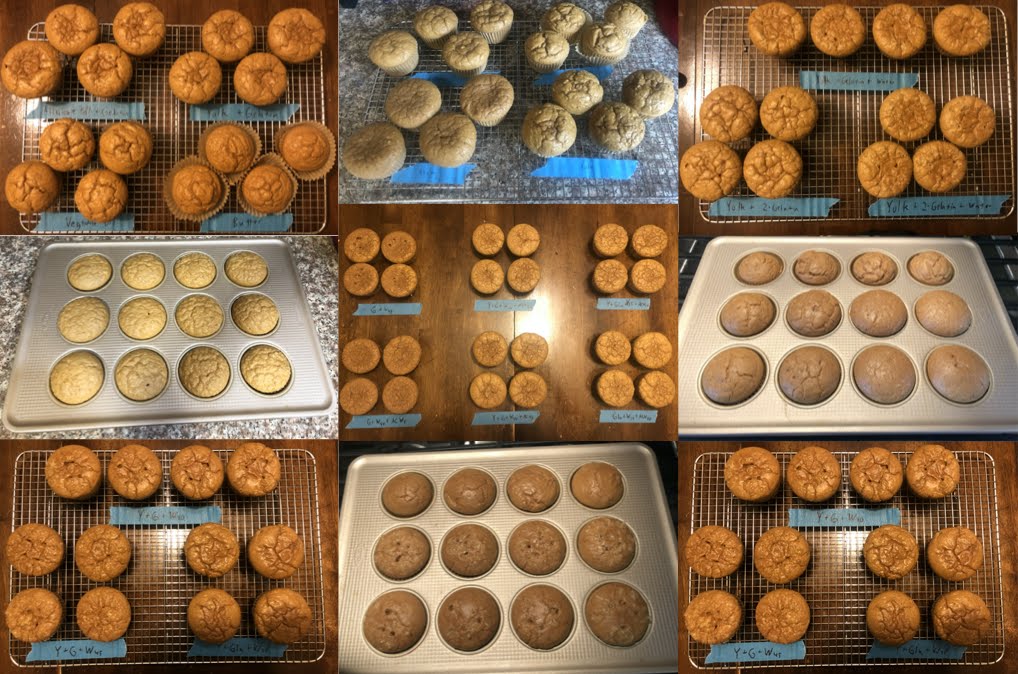
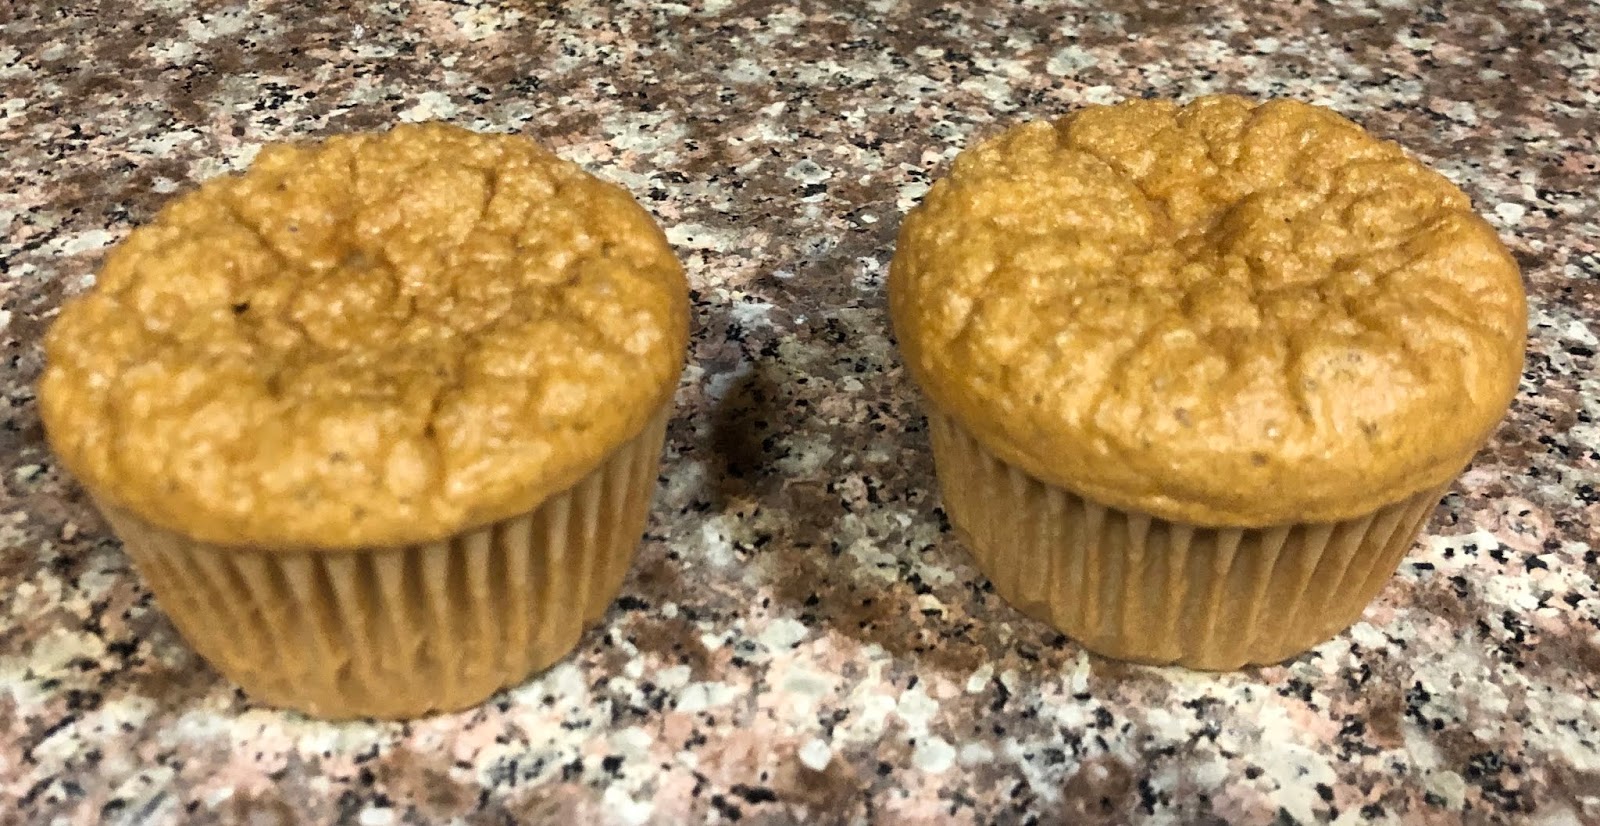
This is what they look like after cooling down. When they were pulled from the oven, they had the normal muffin shape, but the tops deflated during cooling.
To fix these problems, I tried:
Increasing cooking time (went from 14 to 19 min. and the muffins went from underdone in the center to too dry, with no happy medium.
Removed water (much drier).
Other observations:
The tops of the muffins deflate when they cool. Not a big deal to me, but seemed like a symptom of the texture problem.
The batter was extremely thin and bubbled more vigorously than a normal muffin batter. Again, not a problem in-and-of-itself, but it made the recipe more time sensitive and made me think something was not quite right.
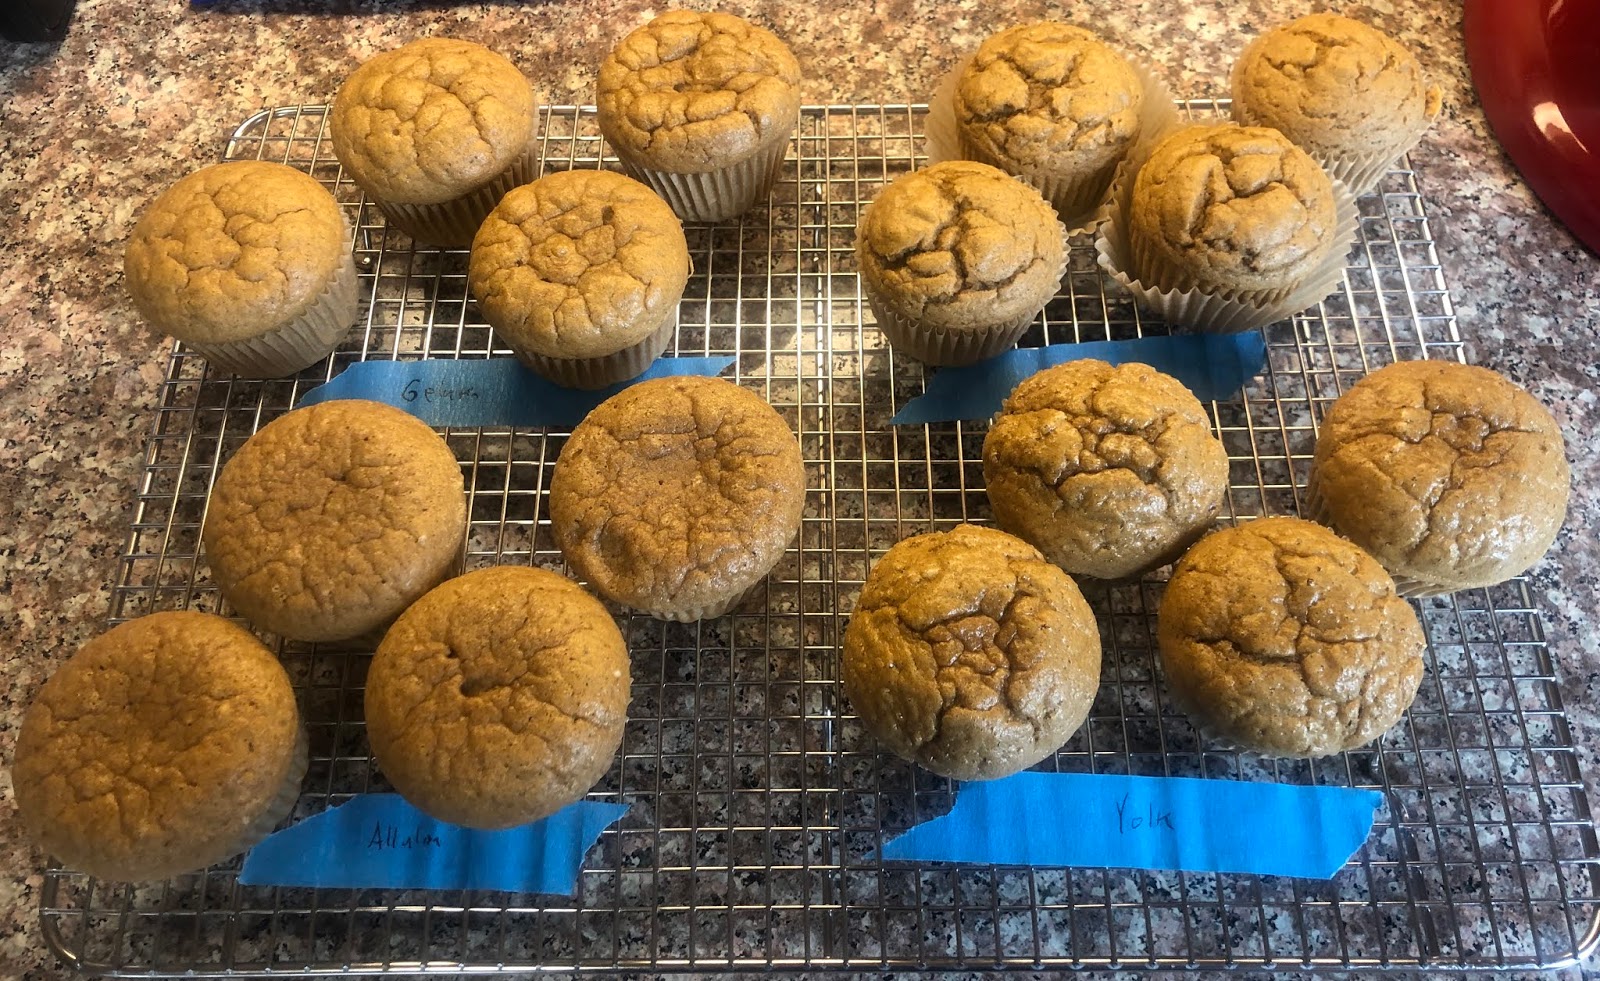
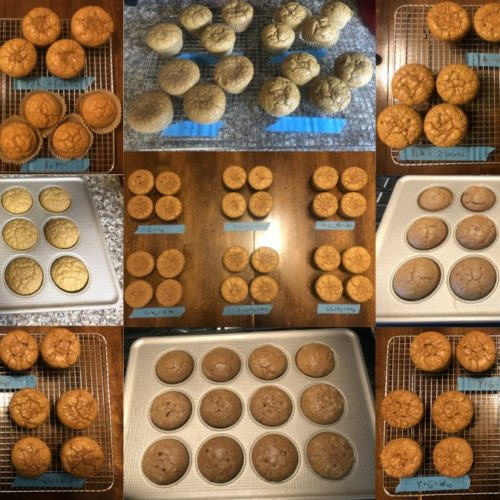
Round 1: Finding the right ingredients
At this point, I decided to ask for advice on r/ketorecipes. From that post, I got a number of good suggestions, all in the vein of adding an ingredient that either better retains moisture (allulose, gelatin) or one that would coat the oat-fiber to mitigate drying (oil, egg yolk). From these ideas I tried the following experiments:
All: For all experiments, I removed the water from the recipe, as that made the muffins drier and (I hoped) would make it easier to taste the difference made by the substitutions. I also wanted to increase the density of the muffins.
Replaced liquid sucralose with 6 tsp. allulose mixed with dry ingredients (suggested by u/NSGod as allulose should retain water and is bulkier)
Batter: No change in consistency or taste
Deflation: No change
Moisture & texture: Perceptibly softer and more moist, but still too dry. Was slightly undercooked in the center of the top.
Taste: No change
Added two packets of knox gelatin mixed with dry ingredients (suggested by u/Samr1221 to retain water)
Batter: Much thicker, similar to a quick-bread batter
Deflation: Almost none
Moisture & texture: Even softer and more moist than allulose, but still a bit drier than I’d like. Top was less dry than the bottom.
Taste: No change
Added 1 tbsp. commercial ice cream stabilizer mixed with dry ingredients. Same concept as gelatin, but it’s a mix of different thickeners and moisture absorbers, so I thought it’d be interesting to compare.
Batter: Much thicker, similar to a quick-bread batter
Deflation: None
Moisture & texture: Similar moisture to gelatin, but denser and a bit tougher texture.
Taste: No change
Added 2 egg yolks (suggested by u/Samr1221 to reduce dry taste, presumably by coating other ingredients)
Batter: A little thicker, but closer to the original than the gelatin or ice-cream stabilizer
Deflation: Almost none
Moisture & texture: Not softer but more moist (in between allulose and gelatin).
Taste: Subtle improvement in taste (creamier?), but might be in my imagination.
All-in-all, a big improvement. All five changes increased moisture and reduced deflation. If I had to pick one, I’d go with the gelatin, but I figured it could be even further improved.
Oat fiber muffins from Round 1
Round 2: Further ingredient screening
With these initial results, I went back to r/ketorecipes for more advice. From that post, the main feedback was to try gluten as a replacement for gelatin or oil/butter instead of or in addition to the egg yolk, so I gave those a shot.
Added 14 g vital wheat gluten mixed with dry ingredients. Same concept as the gelatin.
Batter: Slightly thicker
Deflation: Almost none
Moisture & texture: In-between allulose and gelatin in moisture, but texture was more bread like.
Taste: A subtle savory taste that I liked.
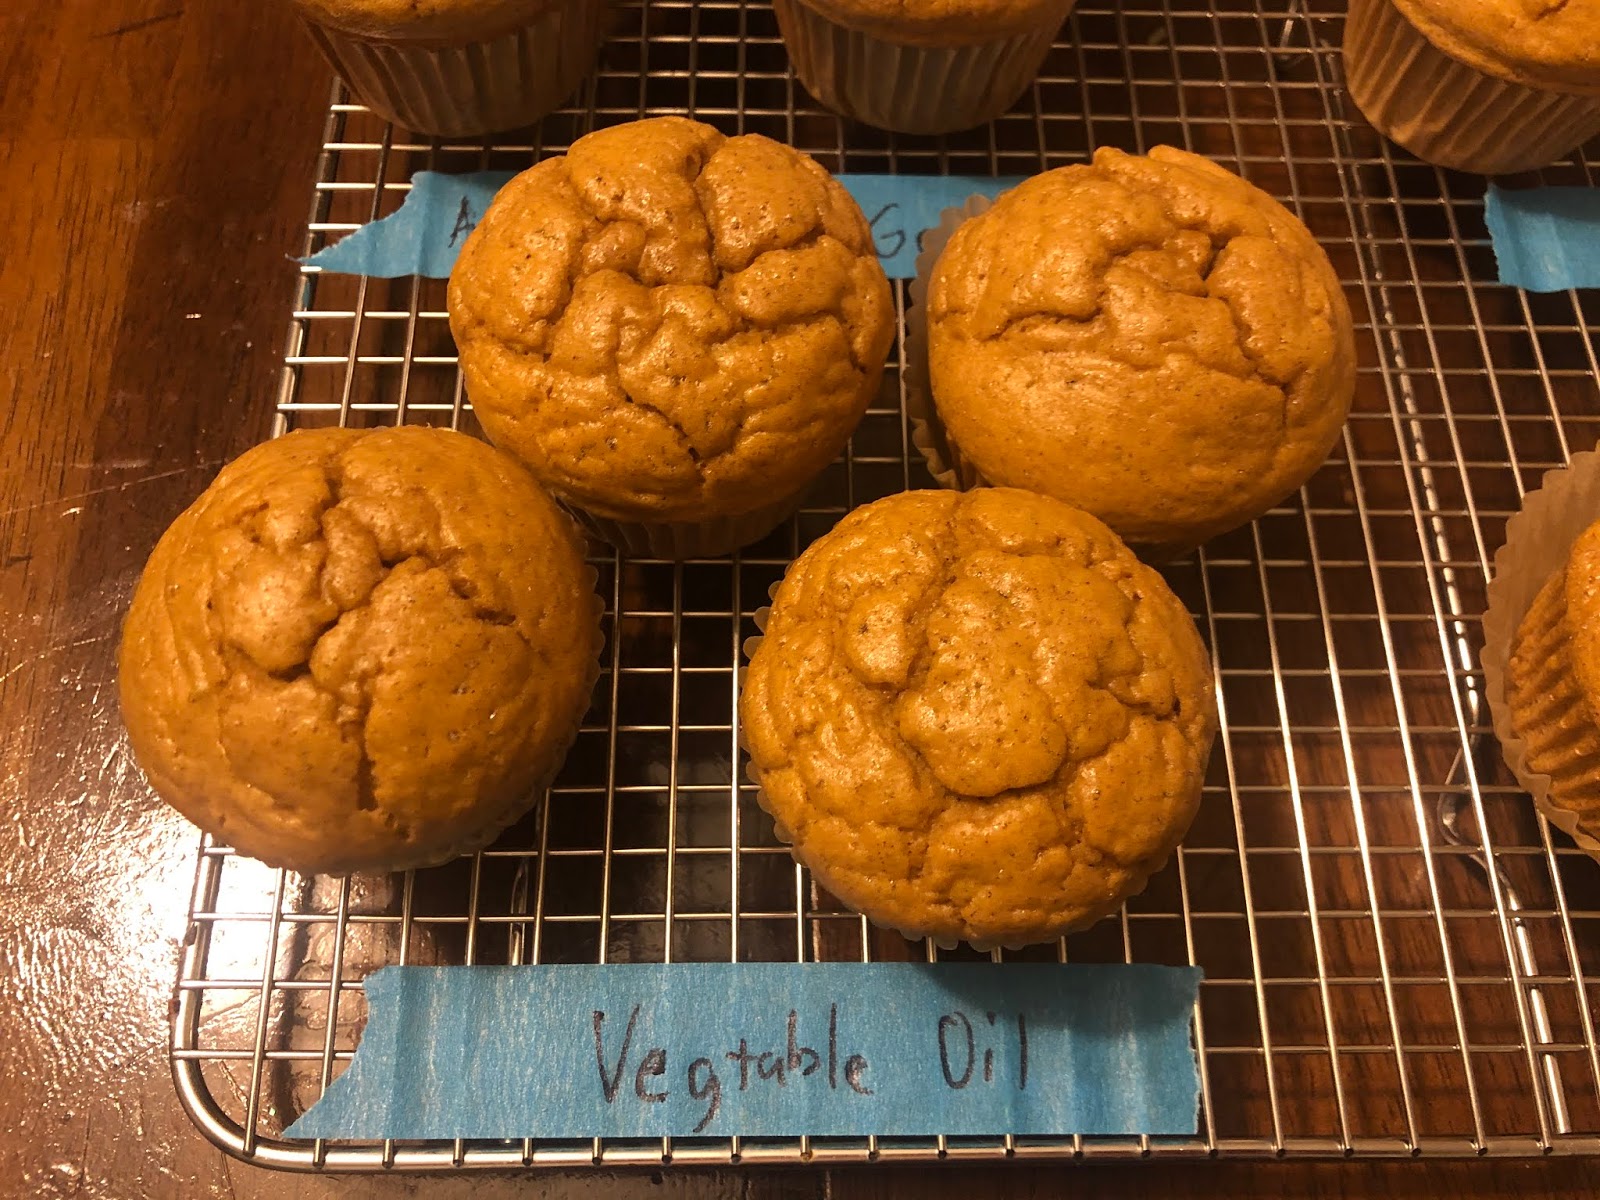
Added 20 g vegetable oil
Batter: no change
Deflation: Almost none
Moisture & texture: In-between allulose and gelatin in moisture, less dry feeling when eating
Taste: no change
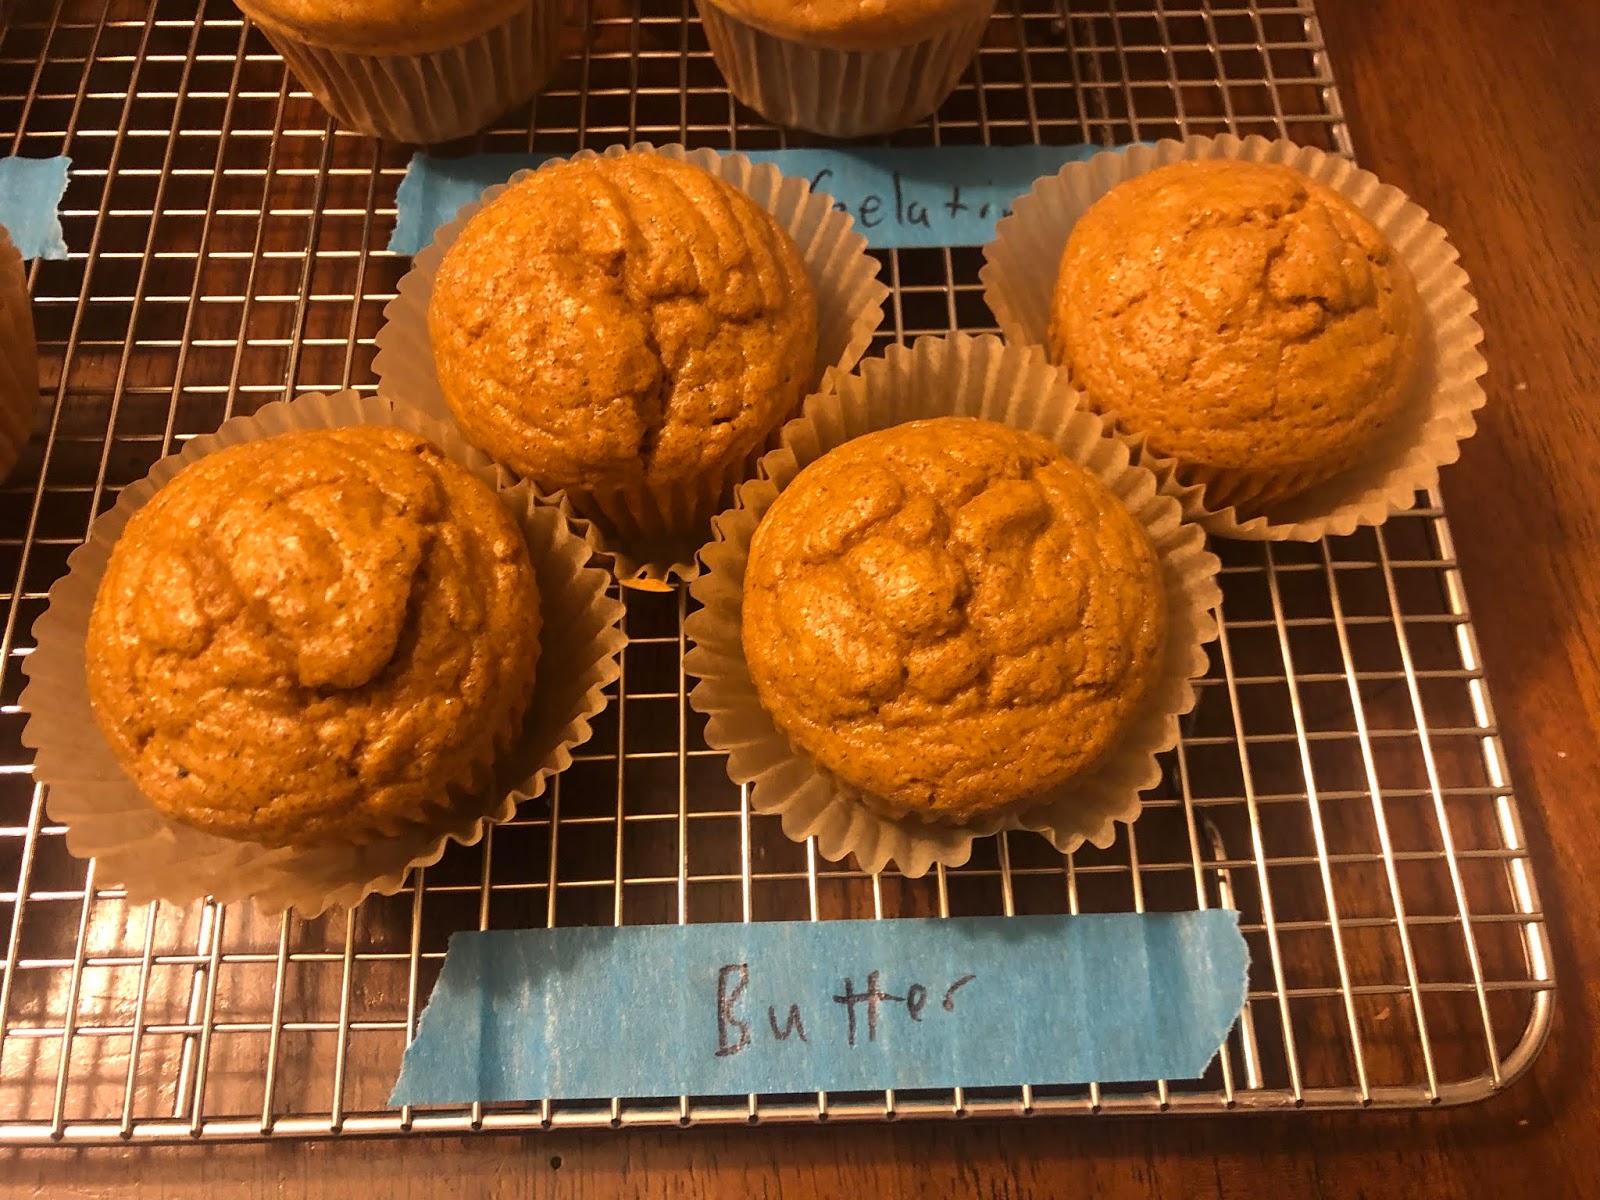
Added 20 g melted butter
Batter: much thicker, seemed like the butter may have solidified (egg whites were cold)
Deflation: Almost none
Moisture & texture: Much less dry feeling, but the muffins were smaller and too dense. If these had been the same size/texture as the rest, they’d have been great.
Taste: no change
Round 2: Butter
Round 2: Vegetable Oil
Round 3: Combining changes
From rounds 1 & 2, I was getting significant improvements from allulose, gelatin, egg yolk, gluten, and vegetable oil, but I thought I could do even better by combining them. I didn’t want to add the additional calories from the oil (15 calories/muffin), so I didn’t include that in the combinations.
6 tsp. allulose + 2 egg yolk + 2 packets gelatin
Batter: Slightly thicker, same as just gelatin
Deflation: Same as just gelatin
Moisture & texture: Slightly moister than just gelatin.
Taste: Same subtle creamy texture as when adding egg yolk to the base recipe
2 egg yolk + 2 packets gelatin
Batter: Same as above
Deflation: Same as above
Moisture & texture: Slightly less moist than above, but still moister than just gelatin or egg yolk by themselves.
Taste: Same as above
Based on these results, combining the egg yolk and gelatin seemed worthwhile, but I wasn’t getting much milage out of the allulose. Since I get stomach issues when I eat more than 20-30 g of allulose per day, I decided to keep the liquid sucralose.
Round 3 combinations
Round 4: Optimizing for taste and convenience
Now that I had the basic ingredients figured out, I did a couple rounds of optimization of quantities. Specifically, I tried to figure out the right amount of gelatin/gluten, water, and seasonings (changes in bold).
2 egg yolk + 4 packets gelatin
Very thick batter, less deflated than 2 packets gelatin, soft & moist, but only slightly more than 2 packets
2 egg yolk + 2 packets gelatin + 60 g water
Thin batter with some deflation. Much more moist and soft. Huge improvement.
2 egg yolk + 4 packets gelatin + 120 g water
Slightly more dense and a bit less “wet” than 2 packets + 60 g water. Very good, but I slightly prefer 2 packets + 60 g water.
Texture is near perfect, but taste is a bit bland. Needs more seasoning.
2 egg yolk + 2 packets gelatin + 60 g water + 1.5 tsp. cinnamon + 2 tbsp. vanilla
Flavor improved a bit. Still not perfect, but I’m happy with it and don’t want to add more ingredients.
2 egg yolk + 2 packets gelatin + 90 g water + 1.5 tsp. cinnamon + 2 tbsp. vanilla
Slightly thinner batter and more deflation, but moister. I prefer this to the 60 g water.
2 egg yolk + 14 g gluten + 60 g water + 1.5 tsp. cinnamon + 2 tbsp. vanilla
Much thinner batter, more bread-like texture, less “dry” taste, and less wet than gelatin. I prefer the gluten to the gelatin, but it’s a little less convenient and adds a slight amount of carbs (0.15 g/muffin or ~0.5 g per meal for me)
0 egg yolk + 2 packets gelatin + 90 g water + 1.5 tsp. cinnamon + 2 tbsp. vanilla
A little more wet and less creamy/drying vs. with the egg yolk, but it removes an ingredient.
0 egg yolk + 2 packets gelatin + 80 g water + 10 g apple cider vinegar + 1.5 tsp. cinnamon + 2 tbsp. vanilla
This was an attempt to improve the flavor, but ended up with a very interesting effect.
The muffin had holes riddled throughout the structure (gas generated from vinegar reacting rapidly with baking powder).
I couldn’t taste the vinegar, but the slight bitter and dry tastes from the oat fiber were completely gone.
2 egg yolk + 2 packets gelatin + 80 g water + 10 g apple cider vinegar + 1.5 tsp. cinnamon + 2 tbsp. vanilla
Indistinguishable from above, so with the apple cider vinegar, the egg yolk no longer has an effect.
2 egg yolk + 2 packets gelatin + 50 g water + 40 g apple cider vinegar + 1.5 tsp. cinnamon + 2 tbsp. vanilla
Slightly denser and chewier than 10 g vinegar. Still no vinegar taste, but I could detect a slight vinegar smell.
2 egg yolk + 14 g gluten + 70 g water + 20 g apple cider vinegar + 1.5 tsp. cinnamon + 2 tbsp. vanilla
Very good taste & texture, but not as large a vinegar effect as with gelatin, probably because the gluten already reduced the bitter and dry tastes.
0 egg yolk + 14 g gluten + 70 g water + 20 g apple cider vinegar + 1.5 tsp. cinnamon + 2 tbsp. vanilla
Slightly more drying than with yolk.
The effect of the apple cider vinegar is extremely interesting, however, I noticed a greater rise in my blood sugar on the days when I ate muffins containing it. That could be a coincidence (it doesn’t contain any carbohydrates), but I need to experiment more before I start using it on a regular basis.
Based on all these experiments my final set of changes from the original recipe are:
Add 2 packets of gelatin or 14 g gluten
Reduce water from 180 to 90 g
Increase cinnamon by 50% and vanilla by 33%
Add 2 whole eggs & reduce egg whites by 60 g (equivalent to adding 2 egg yolks)
Final Recipe
Low-Calorie, High-Protein Oat Fiber Muffin
QD
A low-calorie, shelf-stable oat-fiber muffin. I use it as a protein supplement.
Whisk together wet and dry ingredients in separate bowls, then combine and mix until fully incorporated.
Transfer to parchment-lined muffin pans (8-12 muffins) and bake for 18 min.
Cool completely before eating. Can be stored in a sealed container for at least 4 days (haven’t tried longer).
Notes
Net carbohydrates: 0.4 g/muffinNutritional information calculated per muffin for a 12 muffin batch with gelatin by adding up macros of the individual ingredients.